Sunday, October 21, 2012

Pinterest.  I love it. 
I have found so many inspirations but I don't have enough time in the day! 
Like this.  And this.  And let's not forget this
Of course, you have to get busy making and not pinning all day!  So I did.

 
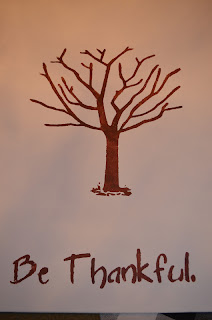
Found this on Pinterest and knew I had to make it. 
You will need a canvas (mine was 14 x 11), paints, and I used my Silhouette for the tree stencil, but you could just as easily free hand.
 
First, I cut out my tree in white vinyl with my Silhouette.
Using the negative image I attached to my canvas and 
sponge painted the words and tree unto my canvas. 
Then when I removed the vinyl I had this fabulous tree ready for leaves.
My two boys, my husband and I each picked our color and starting adding leaves
 to the tree with our thumbs and fingers. 
Love the way it turned out!!  And a super easy project!!
 
 
Pin It!

Friday, October 5, 2012

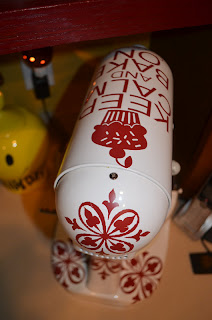
Craft. Silhouette Cameo Kitchen Aid makeover!

I am in love.  There is no other word to describe it.  I just received my Silhouette Cameo this weekend.  UGH!!  This machine is T H E  B O M B!  I have soooooo much to discover, but the minute I broke it out of the box I just knew I had to makeover my kichen aid mixer!  Yea!!

This little project took me all of about 45 minutes (because I'm a newbie) -
and I am loving the results! 
I'll share my to-do's below.

Ok, for the wording on the top I just loved what Create.Craft.Love did so I had to recreate!  I found my London Tube font at Fontspace, and used the same cupcake from the Silhouette online store found here

Some people may just want to stop after that.  Not me.  I wanted to fancy it up after that, so I found TypeBackgrounds font, which has some pretty neat scrolls.  I printed 3 of those in the same size (4.82 W x 6.070 H), then another that was 2.795 W x 3.525 H (for the back round area), and applied randomly to my mixer.


I LOVE the way it turned out!  Happy Silhouette-ing! 
Pin It!

Monday, October 1, 2012

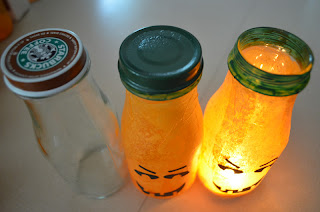
Craft. Frappuccino bottle pumpkin votives.

I have TONS of these bottles and have been frantically searching Pinterest for something to make out of them!  I couldn't find anything that would work for me, so I decided to wing it. 


Using torn up orange tissue paper, Modge Podge, green spray paint, and my new Silhouette Cameo machine (for the vinyl faces) I created Pumpkin Tealights!


Once lit, they bottle does get a bit warm, but I burned it until the candle wax was gone (without the lid) and it worked perfect!  (If you are using vinyl to decorate the front, be sure to push the candle as far back away from the vinyl as you can as it could melt)

Now I have my giveaways for my Annual Pumpkin Carving Party!!  Woo hoo!!
Pin It!

Sunday, August 5, 2012

Craft. Flubber.

Ever heard of this stuff?  It's pretty cool - like slime really. 
My boys LOVED making it and playing with it - great project for those TOO HOT days.
First you need the following, which you can pick up pretty cheap now that school supplies are out:

4 oz Elmers glue 4 oz
Borax (smallest container you can find - mine was HUGE)
warm water
few drops of food coloring

First you take 1/2 cup of warm water and mix with 1tsp of Borox until the Borax is dissolved.
Once that's done, put aside.  Now take another bowl and pour the entire Elmer's glue bottle in, along with 1C warm water, and some food coloring.  Mix this together.
 
Then you mix the two bowls together.  We started by using the whisk, but that was hopeless - its gets thick quick!!  So I told the boys to use their hands!


The kids loved this - can you tell?

We kept this is a ziploc bag and it lasted awhile.
Have a good flubber time!
 Linking up to...
Petite Hermine Linky Party
I [heart] Naptime Linky Party


Pin It!

Wednesday, June 20, 2012

Birthdays. Bowling Birthday.

My baby boy is five....I can hardly believe where the time went. 
Seems like yesterday he looked like this....
and now this.
Yowza. 
So for Deklen's 5th birthday we decided on a Bowling party.  What an awesome adventure we had!  I discovered AndersRuff Retro Bowling printables and I must say that went over HUGE at the party!  I'll warn you ahead of time - there are LOTS of pictures in this post!

First the dessert table.
 I was really excited with the way it turned out!  Black plastic table cloth.  Black foamcore poster board with the 11x16 Happy Birthday Deklen sign double-sticky taped to it. 
The number 5's I printed from my Cricut onto sticker paper.  The polka dot balloons are from Target and they are attached with polka dot ribbon, and the 36" polka dot balloon is from a local party store, but you can buy them online (like from here).
The banner is from the printables package, printed on cardstock and strung together with red polka dot ribbon and double-sticky tape.
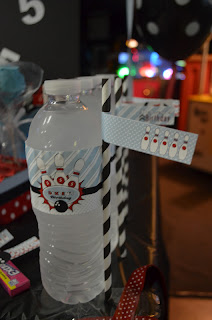
I purchased Costco water and replaced their label with my printed one.  Those blue buckets are from the $1 stop at Target, with a printable on the front.  The block you see behind the bucket - holding the bowling ball cake pops - that is a green floral foam block decorated with ribbon.  I purchased some caramel and cheese popcorn to put into the Popcorn boxes I purchased from HeyYoYo.  The plastic tubes are from Cafe Crop, my local scrapbook store.  I filled them with blue and red gummy bears from the Albanese Candy factory - yum!  The cake pops are supposed to look like bowling balls (ha ha) and I made those with my handy cake pop pan
TIP:  Coloring gel does not work with melted chocolate :-(


 On the tables, I put dollar store plastic table covers, Target dollar spot small blue buckets filled with black and red polka dot napkins wrapped around blue silverware, as well as Campfire marshmallow pops with blue chocolate and red sprinkles - all decorated with printables.
 My cake was inspired by this and was super easy! 
Two 9x13 pans and a glass bowl that I could bake in - voila!  A bowling cake!
 I made all the kids tye-die t-shirts......
 .....and used this iron-on to personalize the backs of the t-shirts!! 
They were a big hit!
We had a great turn out!!  Thanks to everyone for making Deklen's day special :-)
 Mami loves you honey.
Now I'm off to plan his brother's art birthday party!! 

Linking up to

Pin It!

Thursday, May 24, 2012

Birthdays. Lego Birthday Party.

A few years ago before I discovered blogging, Logan was REALLY into Lego's, so it only made sense to have a Lego themed birthday party!  I searched high and low for ideas and my party is a compilation of all the things I found. 

This was by no means a way-out-there party or anything, but my first attempt at an At Home Party and although it was no less than 94 degrees that day (with 200% humidity - I'm not kidding!!) I think it went over well!  I hope you find inspiration here!

First, I free handed the number 7 on a large cardboard box that I had broken down.  I then glued one-inch square tissue paper unto the number, using a pencil as my applicator.
Next was my homemade lego pinata. 
I took two cereal boxes, cut out a large rectangular hole in the front of both
 and glued them together (so that the candy will go into both boxes). 
Then I cut a hand-sized hole at the top (for filling the candy). 
At this time, I also added a handing apparatus - a thick plastic cord.
Then I paper machied the whole thing with newspaper and watered-down glue.
I took little candy cups from Michael's and painted them red then covered the whole thing with red crepe paper and glue the candy cups in place.  Voila - lego!  (Apologize again for no instructional photos - as I said, it was before I discovered blogging!) 
I had a "Guess the number of Lego's" in a jar with cards to complete. 
The winner kept the jar. 
That was sitting on a table of lego scenes that Logan had put together.
The snack table was just a few munchies.  I attempted the Lego pops mentioned here.  Mine turned out NOTHING like hers but the kids like them anyway ;-)  I stuck those in cups filled with Legos.

I setup "Construction" tables, where the guests could build. To have enough legos, I purchased a bulk of Legos from ebay for the party.

The eating area had various "homemade" legos on it for decor.  Capri sun boxes, shoes boxes, all shapes and sizes - wrapped with wrapping paper, and small milk jug caps spray painted and glued on.
The cake topper I made with one of Logan's lego gifts.  I found candy lego's at a local bulk store so I used those as decorations around the bottom. 
They were also added to small bags for the take-home treats.
I downloaded pictures of Lego men from lego.com and printed them on sticker and magnet paper, as well as printed coloring pages for all the kids to do before the party started.  
Everyone got to take a few home. 
I also made an iron-on transfer of the number 7 and created a t-shirt for Logan to wear on his big day.
I downloaded various lego men fonts and used them for the invite envelopes and made this sign for the house with one of the Lego fonts.
I used this photo as my invitation and mounted it to cardstock.

The giveaways were homemade lego keychains, a small lego set, lego candy, and a photo thank you card with a picture of life-size Buzz and Woody lego men.

I hope this gives you some ideas for your next Lego birthday party!!

Good Lego Birthday party sites:

Enjoy! 
p.s.  Bowling Party posting soon!!

Linking up to:
Pin It!